laboratory apparatus , burner , flam regulation , hottest flame of the burner ( unit 2 )
Laboratory apparatus
Laboratory burner -

Laboratory burners are versatile tools used for various tasks in scientific and research settings. Here are some of the common functions and work they perform:
1. Heating : Laboratory burners are used to heat substances in beakers, test tubes, or other containers. This can be important for processes like dissolving solids in solvents or evaporating liquids.
2. Sterilization : They are employed for sterilizing laboratory equipment, such as glassware or metal tools, by exposing them to high temperatures to kill microorganisms.
3. Flame Tests : Laboratory burners are used in flame tests to identify the presence of specific elements or ions based on the characteristic colors they produce when burned.
4. Chemical Reactions : They provide a controlled flame for various chemical reactions, like combustion experiments or organic synthesis.
5. Glassblowing : In some cases, laboratory burners are used by skilled glassblowers to shape and manipulate glass tubing or vessels for custom experimental apparatus.
6. Drying : They are used for drying substances or materials that need to be free of moisture, such as drying wet samples before weighing.
7. Bunsen Burner : The Bunsen burner is a common type of laboratory burner used for these purposes. It allows for the adjustment of the air-to-gas ratio to control the type and intensity of the flame.
In summary, laboratory burners are essential tools in scientific research and experimentation, as they provide a controlled source of heat and flame, enabling a wide range of laboratory processes and experiments.
• Bunsen burner -

A Bunsen burner is a common laboratory tool used for heating, sterilizing, or performing various chemical experiments. It produces a controlled flame by mixing gas (usually natural gas or propane) with air at an adjustable rate. The flame's temperature and characteristics can be adjusted by changing the gas-to-air ratio, making it a versatile tool for laboratory work.
# Work -
The Bunsen burner serves several important functions in the laboratory:
1. Heating:- It provides a controlled, open flame that can be used to heat substances in various types of glassware. This is crucial for tasks like sterilization, evaporation, and the ignition of chemical reactions.
2. Sterilization:- Bunsen burners are often used to sterilize laboratory equipment like inoculating loops and needles by passing them through the flame.
3. Flame Tests:- In analytical chemistry, Bunsen burners are used to perform flame tests to identify the presence of specific metal ions based on the characteristic colors they emit when heated.
4. Glassworking:- They are used in glassblowing and glassworking processes to soften glass rods and tubing for bending and shaping.
5. Chemical Reactions:- Bunsen burners can be used in experiments requiring an open flame as a heat source for reactions or as a way to create a reducing or oxidizing atmosphere.
6. Teaching Tool:- They are often used in educational settings to demonstrate concepts of combustion, heat transfer, and the properties of different flame types.
7. Adjustable Flame:-The Bunsen burner allows precise control of the flame's characteristics, including its temperature and type (oxidizing or reducing), making it suitable for various laboratory applications.
In summary, the Bunsen burner is a versatile tool that plays a fundamental role in various laboratory processes and experiments, particularly those involving heat and flame.
Air flow regulation -
Airflow restriction in the context of a Bunsen burner typically refers to limiting the amount of air that mixes with the gas to create a controlled flame. This restriction is often achieved by partially closing the air vents or adjusting the air intake mechanisms of the burner. Here's why you might want to restrict airflow:
1. Temperature Control:- Restricting airflow can reduce the amount of oxygen available to the flame, resulting in a cooler flame. This is useful when you need to lower the temperature for specific tasks that require gentler heating.
2. Flame Type:- By limiting airflow, you can shift the flame from a hot, blue flame to a cooler, yellow flame. This is important in tasks where you need different types of flames for specific chemical reactions or processes.
3. Preventing Sooting:- When using a Bunsen burner, excessive airflow can lead to incomplete combustion and the production of soot. Restricting the airflow helps minimize soot formation and maintain a cleaner flame.
4. Gas Conservation:- Restricting airflow can help conserve the gas supply, especially when high temperatures aren't required for the experiment or task.
Overall, airflow restriction is a way to fine-tune the Bunsen burner's flame to suit the specific requirements of a laboratory experiment or process. It allows for better control of temperature and flame characteristics, ensuring safe and efficient operation.
• obtaining warm gentle flame with the burner -

Obtaining a warm, gentle flame with a burner refers to creating a controlled and subdued fire using a gas or liquid fuel source, typically for specific applications like heating or cooking. This type of flame is characterized by its soft, non-violent appearance and is often used for tasks that require a steady, low-intensity heat source. Achieving a warm and gentle flame involves regulating the gas or fuel flow, adjusting the air mixture, and carefully managing the burner to ensure the desired level of warmth without excessive heat or flickering. It's commonly used in scenarios such as simmering food on a stove or providing a cozy ambiance with a gas fireplace.
# Process -
Obtaining a warm, gentle flame with a burner typically involves adjusting the burner's settings to create a controlled, low-intensity flame. Here are steps you can follow:
1. Fuel Source:- Ensure you have the appropriate fuel source (e.g., natural gas, propane) connected to the burner.
2. Control Valve:- Use the control valve to reduce the flow of fuel, starting with a low setting.
3. Ignition:- Light the burner using a suitable ignition method (e.g., a built-in igniter or long lighter). Be cautious during ignition.
4. Air Intake:- Adjust the air intake to increase the air-to-fuel ratio, which can make the flame softer and more gentle.
5. Monitor:- Keep a close eye on the flame, and make further adjustments to the fuel flow and air intake until you achieve the desired warm and gentle flame.
Always prioritize safety when working with burners and open flames, and refer to the manufacturer's guidelines for specific equipment instructions.
Hottest film of burner -

The hottest flame produced by a burner depends on the type of fuel and the burner's design. Some of the hottest flames are generated by burners using oxy-fuel combustion, where a high-purity oxygen supply is mixed with a fuel source. For example:
1. Oxy-acetylene torch:- This is known for producing one of the hottest flames, with temperatures reaching up to 6,000 degrees Fahrenheit (3,315 degrees Celsius). It is often used in welding and metal cutting.
2. Oxy-hydrogen torch:- This torch can produce a flame with temperatures similar to oxy-acetylene, around 6,000 degrees Fahrenheit. It's used in various applications, including brazing and glass cutting.
It's important to note that the temperature of the flame can vary depending on factors like the precise fuel mixture, oxygen purity, and burner design. Safety precautions and proper training are crucial when working with high-temperature flames, as they can pose serious hazards.
Note - The hottest flame produced by a burner typically results from oxy-fuel combustion. The temperature of the flame can vary based on the specific fuel mixture and conditions, but some of the hottest flames are generated by oxy-acetylene torches. These torches can produce flames with temperatures reaching up to 6,000 degrees Fahrenheit (3,315 degrees Celsius). Oxy-acetylene torches are commonly used in applications like welding, metal cutting, and brazing due to their extremely high temperatures. Keep in mind that working with such high-temperature flames requires proper training and safety precautions.
Cutting and bending of glass rod -
Cutting and bending a glass rod requires precision and caution to prevent breakage or injury. Here are the steps for cutting and bending a glass rod:
**Cutting a Glass Rod:**

1. Safety Gear:- Wear safety goggles and gloves to protect your eyes and hands from glass shards.
2. Marking:- Measure and mark the point on the glass rod where you want to make the cut. You can use a fine marker or a scribe for this.
3. Score the Glass:- Use a glass cutter or a diamond file to create a shallow score line along the marked point. Make sure the score is even and straight.
4. Breaking:- Hold the glass rod on both sides of the scoreline, then apply gentle and even pressure to snap the rod at the scored line. It should break cleanly along the score.
**Bending a Glass Rod:**
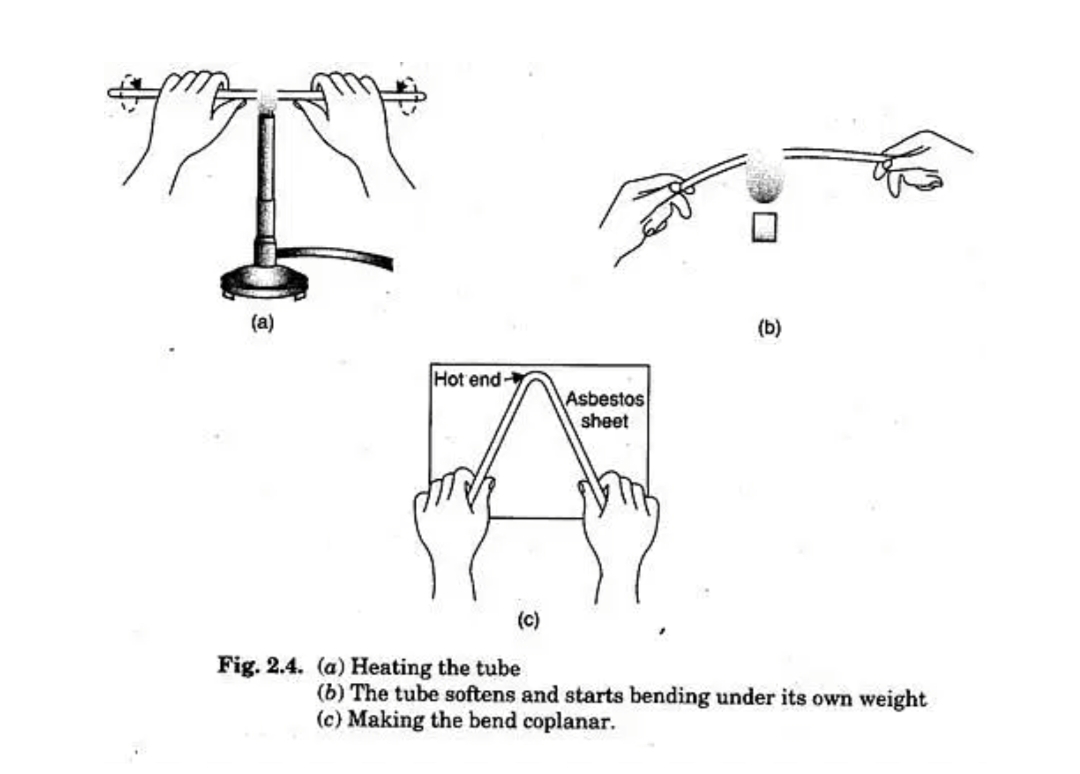
1. Safety Gear:- Keep wearing safety goggles and gloves.
2. Heating:- Use a heat source like a Bunsen burner or a propane torch to heat the section of the glass rod that you want to bend. Heat it evenly by moving the rod back and forth through the flame.
3. Bending:- Once the glass becomes soft and pliable, gently bend it to the desired shape. Use tools like pliers to help with the bending if needed.
4. Cooling: After bending, let the glass rod cool slowly to room temperature. Placing it on a heat-resistant surface or using an annealing oven for controlled cooling is ideal to prevent cracks due to thermal stress.
5. Inspect:- Examine the glass rod to ensure it hasn't developed any cracks during the bending process.
Be extremely cautious when working with glass, as it is brittle and can break easily. Proper safety measures and techniques are crucial to ensure a successful cut and bend.
Fire polishing of glass tubing and rod -
Fire polishing is a process used to smooth and round the edges of glass tubing and rod. It's commonly done to remove sharp edges and create a clean, polished finish. Here's how to fire polish glass tubing and rod:

1. Safety Gear:- Always wear appropriate safety gear, including safety glasses and heat-resistant gloves, to protect yourself from potential burns or glass shards.
2. Flame Source:- Use a Bunsen burner, propane torch, or a glassworking torch with a small, clean flame.
3. Clean the Glass:- Make sure the glass rod or tubing is clean and free of any contaminants. Any impurities on the surface can affect the quality of the fire polish.
4. Heat Gradually:- Hold one end of the glass tubing or rod, and slowly rotate it while introducing it into the flame. Start by heating the very end, and then work your way along the edge. Gradually move the glass through the flame to ensure even heating.
5. Watch for Softening:- As you heat the glass, it will start to soften and become more pliable. Pay attention to the glass's appearance – it will change from dull to glossy as it reaches the proper temperature.
6. Round and Smooth:- When the glass reaches the right temperature, gently round and smooth the edges using a rotating motion. You can use a heat-resistant paddle, marver, or even a small graphite rod to help shape the glass.
7. Cool Gradually:- After achieving the desired shape, remove the glass from the flame and let it cool gradually. Placing it on a heat-resistant surface or using an annealing oven is ideal to prevent stress cracks.
8. Inspect:- Examine the glass carefully to ensure that it has been polished and rounded to your satisfaction. Check for any remaining sharp edges or imperfections.
Fire polishing is a common technique in glassworking, especially in laboratories and glassblowing. It not only enhances the appearance of glass but also makes it safer to handle.
Done by Rohit Joshi....
Also read these ...


Comments
Post a Comment